Using the DV Access Point Dongle

-
The first step is to GET REGISTERED! If you are not already registered on the D-STAR network, you need to get registered. It is very important that you register with ONE gateway only. Once you are registered on one gateway, you are registered on them all. Follow the instructions at http://www.dstargateway.org for registration. Until you are registered, you will only be able to listen to connected systems. No transmission is allowed for unregistered callsigns.
-
-
Next, make sure you are connected to the Internet. All communications between the DVAP and a gateway or reflector use your Internet connection.
-
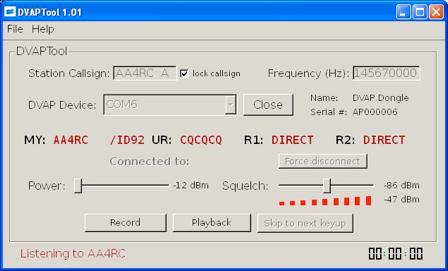
Once the DV Access Point Dongle is opened, the Device Name and Serial Number fields should show data specific to the hardware you have opened. If it does not, you may need to select a different device in the DVAP Device box.
-
DVAPTool then makes a request to an Internet based D-STAR gateway name server. If DVAPTool has problems connecting to the server, a message box will pop up letting you know that there was a problem. Check your Internet connection and try again.
-
-
Set the Power level slider to maximum (10dBm or 10mW) and set the Squelch level slider to half way between your current noise level (the red bars below the slider) and the max level (similar to the pic above).
-
-
You may record and playback conversations by clicking the "Record" and "Playback" buttons. While playing back, you can click the "Skip to next keyup" to skip to the next person talking. Note that playback is done only to your radio, not to a connected gateway or reflector.
-
-
You can walk away from the PC/Mac now since all control commands are issued from your D-STAR radio.
-
The DV Access Point Dongle has four LED’s which indicate the current operating status. They are colored green, red, yellow, and blue (in that order from left to right).
-
-
The green LED shows the mode of operation, slow pulsing indicating idle and solid green shows the DVAP is receiving RF from a radio.
-
-
The red LED shows that the DVAP is transmitting to your radio.
-
-
The yellow LED shows data underruns from the connected gateway/reflector or missed D-STAR packets from your radio.
-
-
The blue LED shows data is being sent from the PC/Mac to the DVAP.
Status Indicators
Operating Notes
-
The DV Access Point Dongle is a high speed, real time device. It communicates with the PC/Mac at 230Kbps and needs adequate CPU speed and time to operate properly. Many operations on the PC/Mac can interfere with normal operations. These include screen savers, web browsers, instant messengers, etc. For best operation, avoid running CPU intensive applications when operating the DV Access Point Dongle.
-
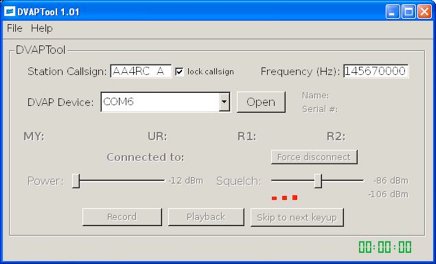
To start using the DV Access Point Dongle, double click on the DVAPTool icon on your desktop. DVAPTool will start and display a dialog window similar to the picture below.
-
-
There are two text entry boxes that require input, the Station Callsign and the Frequency box. Enter your personal callsign in the Station Callsign text box. It is recommended (but not required) that you add an “A” terminal in your gateway registration and that you use the “A” in the eighth character of your callsign as shown below.
-
-
Enter a simplex frequency for operation in the Frequency box. Consult the frequency bandplan for your country/area for appropriate frequencies. Enter the entire frequency in Hz (e.g. 146550000 for 146.550 MHz).
-
-
The “lock callsign” checkbox next to your Station Callsign will allow you to limit the radio users of your DVAP to only your callsign or any callsign. This is the way you can prevent others from using your DVAP.
-
-
The DVAP Device drop down selection lists devices that use the FTDI chip used in the DV Access Point Dongle device and other serial to USB devices. Select the appropriate device.
-
-
Click on the “Open” button to connect to the DV Access Point Dongle.
Enter your callsign into the MYCALL field of your radio. Select DV mode and configure simplex operation, usually by holding down the "DUP" key until there is no "dup+" or "dup-" on the radio display. You do not need to enter RPT1 nor RPT2 since the radio will place "DIRECT" in both when in simplex mode. All commands are entered into the URCALL field as detailed below.
Enter the following values in the URCALL field on your radio:
"DVAP I" (request voice ID from the DVAP)
"DVAP E" (key down and speak for echo test)
"CQCQCQ " (transmit to a connected system)
"xxxxxxmL" (to link, replace XXXXXX with the gateway or
reflector callsign making sure to use 6
characters filling the end with spaces as needed.
Replace the "m" in the 7th character with the module
to which you wish to link. Use "L" in the 8th
character to indicate the Link command. For
example, to link to Reflector 001 module C, use
"REF001CL" in URCALL. To link to gateway W4DOC
module A, use "W4DOC AL" in URCALL)
" U" (unlink from a linked gateway/reflector. Make sure the “U”
is in the eighth position of URCALL)
Note that, other than "CQCQCQ ", the commands above are processed locally and not transmitted to a connected system.
Radio Command Reference
Customizing Voice Message Playback
-
You can replace the included files that are played to indicate command actions. The files are:
-
-
alreadylinked.dvrec (played when you try to link when linked)
-
-
alreadyunlinked.dvrec (played when you try to unlink when unlinked)
-
-
dvap-id.dvrec (played when "DVAP I" is issued)
-
-
gatewayunknown.dvrec (played when the requested gateway is unknown)
-
-
remotesystemliked.dvrec (played when the requested system is linked)
-
-
remotesystemlinkedro.dvrec (played when the requested system is linked receive only)
-
-
remotesystemunlinked.dvrec (played when the linked system is unlinked)
-
-
To record a file, make sure the DVAP is open and not connected to a remote system. Click the "Record" button. Key down and speak your announcement. Click "Stop recording". Listen to your recording by clicking on "Playback". You may record the announcement as many times as you like until you are happy with it. DVAPTool places the recording in the file dvaptool.dvrec in the folder from which it was started. Simply rename "dvaptool.dvrec" to one of the above file names to have DVAPTool use it instead of the default.
Support and Updates
-
Please make sure to join the DVAPDongle yahoo group for program update announcements. Go to http://groups.yahoo.com/group/DVAPDongle to join.
-
-
Send support questions/issues or suggestions to support@dvapdongle.com
Program Your Radio